© Emily Fu Foundation: Love Is Forever. Helping others is life’s true meaning.
Angel SoundTM
Angel Sound TM incorporates many advanced training features for both novice and experienced cochlear implant and hearing aid users. After installing the software, use the Quick Start guide to get started on your auditory training.
Hints & Tips You can structure your practice sessions however you like but we recommend that you initially spend 30-60 minutes per day, 5 to 7 days per week, on the building blocks of listening—pure tones, consonants, vowels and words. If you take the Auditory Assessment first, you will be placed in the listening program according to your individual skill level. You can try any of the other Levels and Modules at any time. Ultimately, you are in control of your progress.   Monitor display: For optimal screen clarity, set the screen resolution to 1024 x 768 or higher. To set the screen resolution, go to the Start Menu, select Settings, then Control Panel, then Display; the Display Properties dialog will appear. Click on the Settings tab, and move the screen resolution setting to be 1024 x 768 or higher. Alternatively, you can access the Display Properties by right-clicking on the Desktop.  Listen to AST:  You can use either your computer speakers or your TV/Hi-Fi cable to listen to AST. Be sure to listen in a quiet place, especially if you are using computer speakers.  Listening with computer speakers: If you use computer speakers, set the speaker volume to a comfortably loud level and set the tone (if available) to be flat. Use the sound processor settings you use for everyday, quiet listening environments.  Listening with TV/Hi Fi cable: The TV/Hi-Fi cable provides a direct connection between the computer soundcard and your sound processor, thereby eliminating environmental noise while you practice. Be sure to use the appropriate cable for your specific sound processor. Follow these steps:  •	Turn off your processor.  •	Make sure the TV/Hi-FI cable volume is set to 0.  •	Connect the cable to the soundcard output. For many computers, the output is marked with a picture of headphones.  •	Connect the other end of the TV/Hi-Fi cable to the audio input on your sound processor. Depending on the sound processor, you may need to use an adapter to make this connection. Refer to your sound processor owner’s manual for additional information regarding audio input.  •	Select the sound processor program and settings you normally use in quiet listening environments.  •	Turn the soundcard volume to near maximum. Usually, there is a speaker icon on the tool bar. Click on this icon and move the volume slider to near maximum level. Alternatively, there may be buttons on the keyboard to adjust the volume.  •	Select a module from AST. Click on the Preview button. Click on a sound and slowly increase the TV/Hi-Fi cable volume to a comfortable level.   Keeping track of your progress: AST automatically keeps a record of your results for each Training Group within each Module. Results are organized by session names. You should occasionally print your results to keep a record of your progress. We recommend that you share the results with your audiologist and/or auditory therapist. You can print detailed results within each Training Group or a summary fof all Training Groups (“Report”).   To print a summary Report, select the desired Session and click on Print. The Angel Sound Training Print dialog will appear. Check the items you would like to print, and then click OK.   You may also want to print the “Learn More” files that explain AST’s Test and Training procedures for your clinician or therapist. Click on the Learn More button and the Help file will open. Select a topic from the left column. Once the topic is displayed, right-click on the document and select Print. You can do this for any Learn More topic.   Frequently Asked Questions Details regarding the different training exercises and tests can be found by clicking on the Learn More button on the upper right side of the screen. Also, if you have problems using Angel Sound Training Program, check below for troubleshooting tips and solutions to common problems.  What is a Session? In Angel Sound Training (AST), all the test and training results for any Training Group and Module are stored within a Session. Think of a Session as a “user” When you load a Session, all the user’s previous results are available. New results for the user will be appended to the Session automatically. You can create up to five different Sessions. If you are a bilateral implant user and you use AST to practice each ear separately, you might name one Session “Left” and the other “Right.”   AST will automatically load the most recently opened Session. Once you open a Session, AST is ready to be used. You can Test, Train, open a different Module, or view and print results. If you want to open a different Session, click on the SESSION heading and the Session window will open; click on the desired Session from the list. To create a new Session, click on the New icon and the New Session dialog will appear; enter the new Session name.   What is a Module? AST consists of many test and training Modules that contain the various exercises. By default, AST will load the Basic Training Module. If you want to try other Modules, click on the Advanced Modules heading; the Advanced Module Management dialog will open. A list of all Modules will be displayed, and the currently active Module will be indicated. To load a different Module, click on the Module and a new set of Training Groups will appear.  What is a Training Group? Each Module contains a number of Training Groups. Each Training Group contains the sounds and exercises you will use for training and testing. Each Training Group also contains a Preview function to audition the sounds. After clicking on a Training Group, the headings “Introduction,” “Preview,” Training,” “Test,” and “Result” will appear in the Third Row. Click on any of these headings to continue.   How can I preview sounds?  After opening a Training Group, click on the Preview heading. A number of images will appear on screen. Click on any image and the corresponding sound will be played. Some Training Groups have many sounds.You can access different pages by clicking on the Forward or Back Buttons. Click the Stop button to exit Preview.  How does the training work? Within each Training Group, there are a number of exercises and levels of difficulty. For some Training Groups, the lower levels of difficulty involve discriminating between sounds. As discrimination improves, the contrast between sounds is reduced. After an incorrect response, auditory and visual feedback is given so you can compare your answer to the correct answer. Once you have learned to discriminate sounds, you will learn how to identify sounds. A sound is presented and you must choose from among several response choices. Again, if you answer incorrectly, auditory and visual feedback is given. As you advance, the number of response choices may be increased and/or the contrast between response choices may be reduced. For the most difficult tasks, sounds are presented with competing background noise. The Advanced Modules offer even more difficult listening tasks like open-set sentence recognition in noise. After you assess your performance with a Test, AST will automatically recommend a Level of difficulty. However, you may try any Level you would like.  How often should I take a test?  Testing is a good way to monitor your progress. In AST, there is no feedback during a test and some of the sounds may be different than those used for training. AST uses the Test results to recommend future levels of difficulty for Training. The tests are generally short. You should test your performance after every 5-10 training exercises.  What do the results mean? The graph shows your Test results over time since you began training. This why you should regularly test your performance. The table shows the number of training exercises and total time spent training for each level. The Initial Assessment Score shows your performance on your first test. The Final Assessment Score shows your performance for your most recent Test. The Improvement After Training shows the difference in performance between the First and Final Assessment Scores. You can print these Results by clicking on the Print This Page Button. You can see detailed results, including Training and Test summaries and the Test Matrix by clicking on one of the Levels of Difficulty.  What does the “Speed” button do? The Speed button provides real-time adjustment of the speaking speed for the training sounds. To adjust the speaking rate, click on the Speed button; the Time-stretching dialog will appear. Enable the Real-time Stretching Function. Use the slider to adjust the speaking rate. Note that the values will change as you move the slider (100 = no adjustment; <100 = slower speech; >100 = faster speech). Note that using the Real-time Stretching Function may slow down AST; if so, disable the Real-time Stretching Function. Also, extreme settings may result in an unnatural sound.   What does the “Volume” button do? The Volume button adjusts the sound card output from within AST. Click on the Volume button; the Set Sound Volume dialog will open. Adjust the sound level using the slider. If you want to use this level for other training exercises, enable the Set Current Volume as Today’s Default. In general, it is best to leave this setting at or near maximum. Note that the volume setting does not change the volume control setting on the speaker or the volume control setting on the TV/Hi-Fi cable.    Troubleshooting Details regarding the different training exercises and tests can be found by clicking on the Learn More button on the upper right side of the screen. Also, if you have problems using Angel Sound Training Program, check below for troubleshooting tips and solutions to common problems.  Problem — I cannot hear any sound. Try the following:  •	Check that the speakers are connected properly and powered on •	Check that the computer volume is not muted (click on speaker icon in the toolbar) •	Check that the sound card is working properly (Go to Start Menu/Settings/Control panel/Settings/Sounds and Audio Devices and look to see if the correct audio hardware is selected and working)  Problem — I cannot activate AST. Try the following:  •	Make sure you are connected to the Internet during the first time use.  Problem — Screen looks distorted or smeared. Try the following: •	Be sure the screen resolution is 1024 x 768 or higher. •	Right-click the mouse button and select “Refresh Screen.” •	Quit and restart AST or, if necessary, reboot the computer and restart AST.   Problem — AST runs very slowly; the sound is intermittent. Try the following:  •	Make sure your computer meets the minimum system requirements. •	Shut down all other programs except AST to free up memory •	Reboot the computer and restart AST.  Problem — AST doesn’t look like the last time I used it. There are different Training Groups. Try the following:  •	Make sure you have selected the correct Session name (go to the Session heading) •	Make sure you have selected the correct Module (go to the Modules heading) Step 1: Start the Angel SoundTM: After Angel SoundTM program, please click the button in the middle of the screen which is shown as follows to start the training. Note that you can simply use the program with this option only. All the training data and testing data will be saved in the local PC database. If you want to share the data with friends or audiologist, you can use the following “remote server” option. All the data in the local PC database can also be synchronized with remote server for better data sharing and access. The latest version (5.08.03) also allows the remote server login, which allows the user to save the training and testing results at central server. With remote server, the users can access the training and testing data from any computers at any time. To use the remote server login, click the button “Internet Edition Login” in the bottom of the welcome screen. After that, a login window will pop out, the user need to type the account name and password to login their own account. The user is also allowed to create a free new account at any time by clicking the link in the bottom of the remote login window or go to the following website (http://angelweb.emilyfufoundation.org/). For the demo purpose, the user can use the temporary account (demo) and password (1234567) to try the remote login function.    OPTION 1: LOCAL EDITION								 Please click the button in the screen shown in the right.                              Note this option is recommended for typical user.				 												 OPTION 2: INTERNET EDITION Please click the button in the screen shown in the right.  Note that this option is recommended for audiologists or researchers (data sharing).  If you froget your password or want to update your account information,  you can use the following website: http://angelweb.emilyfufoundation.org/  Step 2: Select Session or Create New Session: After entering Angel Sound program, a session window will pop out. Double click on any of the previous Sessions to open that Session. You can also create a new Session by clicking on the “New” button, and then name and save the new Session. Here is the instruction about session selection.  Option 1: Select Existing Session  1) Choose the session you want to use by clicking it;		2) Select the Session by clicking the button from toolbar or menu.        Option 2: Create NEW Session (after creating, then follow the instruction of option 1 to enter)    1) Click “NEW” button from toolbar or menu.			2) Input name (any) and note (optional), then Click “Save” button             Step 3: Select Module: After selecting the session, the program enter into a module selection stage. All the available modules will be shown in the screen. The module with line border is the one you have used in the last time. You can continue to use the previously used module or select a new module to train. Please click the image in the screen to select the appropriate module.              4. Select Training Group:  Once the Module is loaded, you can select a Training Group. Each Module contains several Training Groups listed on the left side of the screen (The following shows the screenshot of training groups in the Basic, Openset, Music, Auditory, and Assess Module). Click on one of the Training Groups. The Group name will appear along with several selectable headings.                Step 5: Preview, Training, Test, Result:  There are three activities for each Training Group: Preview, Training and Test.    Preview allows you to listen to the sounds you will hear during Training or Testing. Click on the Preview heading, and a list of the sounds will appear. Click on any item, and the sound will play. There are usually several pages of sounds to preview Click on the Forward or Back buttons to move between pages. Click the Stop button to exit Preview.   Training helps you to discriminate and identify different sounds. During Training, you will be asked to identify a sound, followed by auditory and visual feedback. Click on the Training heading, and a number of Levels of difficulty will appear. One of the Levels will be underlined as the recommended practice level. Click on a Level to begin Training. After each sound is played follow the instructions about how to respond (e.g., “Click on the different sound,” or “Click on the matching sound”). After each response, you will get either visual feedback (“Correct”), or auditory and visual feedback (“Incorrect,” with highlighted playback of your response and the correct response). Your results will be displayed at the end of the Training session.   Test monitors your progress and adjusts the difficulty for training. You should periodically test your performance without the feedback. Click on the Test heading, and the test will begin. A sound will be presented and the response choices will be displayed. Follow the instructions about how to respond (e.g., “Click on the different sound,” or “Click on the matching sound”). No feedback is given during a Test session. Your results will be displayed at the end of the Test session.   Result contains all the Test and Training results within the selected Training Group. As you complete different Training exercises and Tests, the results are automatically saved. Click on the Result heading to display a graph and text description of your Training and Test results. Results may be printed by clicking on the “Print This Page” button. You can click on the Levels headings above the graph to access more detailed information.   Step 6: Adjust the Speaking Rate and/or Pitch by Using Speed Control Function:  Angel Sound itself includes comprehensive training materials (over 10,000 different sounds). The program can also generate additional novel sounds by using real-time signal processing. One of such functions is called real-time time and pitch adjustment. Click the Speed Control Button in the right bottom corner.  In real life, people speaks at very different speaking rate. Someone speaks very fast while ohters talks very slowly. It is important to understand speech at all these situations. This function allow the user to control the speaking rate of the speech. Press click the “Speed” button in the right bottom of the screen (See left figure, panel #3). A dialog will pop out. The normal speed is 100, which is the speaking rate of the original recording (typical speed). 50 means that speaking rate is 2 times slower while 200 means that the speaking rate is 2 times faster. Also, different speakers have different spectrum due to the difference in vocal tract. This function also allows the user to adjust the pitch of the speech signals. The normal pitch is 100. 50 means that the spectrum is downshifted by one octave. 200 means that the spectrum will be upshifted by one octave. The speaking rate and pitch can be set as a fixed level or can be randomly set in the given range.   Step 7: Data Synchronization between Local and Remote Server (For Version 5.03.01 or higher):  It is very easy to synchronize the training and testing data between local and remote server. After the program is running, login to the remote server using your account name and password. Click the “Sync” button in the right bottom of the screen. A new data transfer window will pop out. Click the Sync button in the middle to synchronize all the data or any specific session between local and remote server.
Angel SoundTM: Quick Start
If you think that Angel SoundTM is useful, please share it!
Step 0: Activate the Angel Sound TM (For the First-time Users Only): After installation is complete, click on the “Angel Sound” icon, which will appear on the desktop [or click Start > All Programs > TigerSpeech Technology > Angel Sound ]. The program will launch. Click the “Please Click to Enter Angel Sound” button on the bottom of the page. If your computer is connected to the Internet, the software will be 
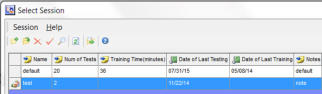
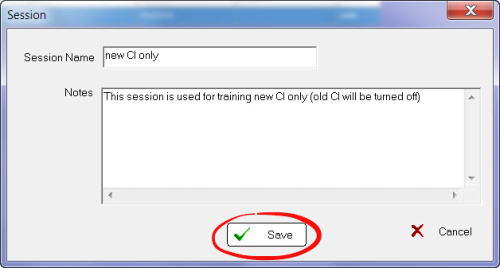
automatically activated. After the program is activated, a “Session” dialog box will open. Enter the session name and click the “Save” button to continue. If your computer does 
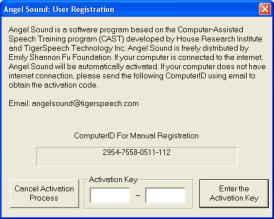
not have internet connection, a manual activation is required to activate the software. A new window will pop out once the software detects the lack of internet connection. Please send the ComputerID, which is shown in the window, using the following email address (angelsound@tigerspeech.com) to obtain the activation code.
GO TO WEB